|
Step 1 - Plan:
With your final design in hand, begin to establish
the wall location and proposed grades. Locate all
utilities and contact local utility companies before
digging. Mark a line where the front of the wall
will be placed, keeping in mind the 1" (25 mm)
setback per course.
 Step
2 - Excavate: Step
2 - Excavate:
Excavate a trench down to the foundation grades
specified in the design. The front of the trench
should be 6" (150mm) from the planned face of the
block. The trench should be a minimum of 24" (750mm)
wide (front to back) and 12" (300mm) deep. This
depth assumes one unit is buried (unit height of 6"
[152mm]) plus the compacted granular base minimum
depth of 6" (150mm). The rear 6" (150mm) of the
trench is excavated to account for the drainage
layer. Excavations should be conducted in accordance
with local codes.
Step 3 - Verify Foundation Subgrade:
Once the foundation trench has been excavated to the
specified elevations, the native foundation soil
must be checked to ensure that it has the required
allowable bearing capacity specified in the design.
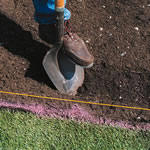
Step 4 - Prepare the Compacted Granular Base:
 Start
the base at the lowest elevation of the wall. The
base should be composed of well-graded,
free-draining (less than 8% fines), angular granular
material (3/4 minus crushed rock), and compacted to
a minimum of 95% Standard Proctor Density (SPD). The
minimum base thickness is 6" (150mm) or as required
to reach competent founding soil. Geotextile might
be required under the granular base. The minimum
base dimensions are 24" (600mm) wide (front to back)
and 6" (150mm) deep. The additional 6" (150mm)
trench width allows for the placement of the drain. Start
the base at the lowest elevation of the wall. The
base should be composed of well-graded,
free-draining (less than 8% fines), angular granular
material (3/4 minus crushed rock), and compacted to
a minimum of 95% Standard Proctor Density (SPD). The
minimum base thickness is 6" (150mm) or as required
to reach competent founding soil. Geotextile might
be required under the granular base. The minimum
base dimensions are 24" (600mm) wide (front to back)
and 6" (150mm) deep. The additional 6" (150mm)
trench width allows for the placement of the drain.
Step 5 - Step the Base:
When the grade in front of the wall slopes up or
down, the base must be stepped to compensate.
Working out the stepped base as the wall steps up in
elevation, the foundation steps must be located to
ensure the minimum embedment is achieved. The height
of each step is 6" (152mm), the height of 1 course.
The 1" (25mm) offset must be accounted for at each
step.
Step 6 - Place Filter Cloth:
Lay the approved filter fabric (geotextile) along
the bottom of the rear of the trench and extend up
the exposed excavation to the proposed wall height.
Leave adequate material at the top to fold back
towards the wall (completely containing the drainage
material). Stake the filter cloth against the slope
during construction.
Step 7 - Place the Drain:
Various options for drain placement may exist,
depending on how the pipe is to be outlet. The drain
may be outlet through the wall face or connected to
a positive outlet (sewer). The drainage system is
extremely important and outlets must be planned
prior to construction. In the case of connecting to
a positive outlet, the drain should be placed at the
lowest possible elevation and sloped at a minimum of
2%. At the rear of the excavation, allow the
granular material to slope down on the sides towards
the drain trench. In the 6" (150mm) area behind the
base, place the approved drain tile (4" perforated
drain with filter sock) on top of the filter cloth
and minimal granular coverage.
 Step
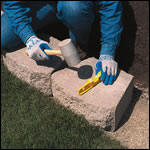
8 - Place the First Course: Step
8 - Place the First Course:
Position a level string to mark location of the back
of the first course (should be 12" [300mm] from the
proposed wall face). Place the first course of
blocks side-by-side (touching) on the granular base
- unless your wall curves, then space the blocks
slightly apart to allow for the 1" (25mm) setback.
Ensure units are level front to back and side to
side. Extra care should be taken at this stage as it
is critical for accurate alignment. Complete the
entire base course before beginning the second
course.
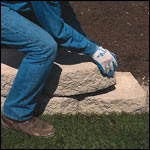 Step
9 - Second & Additional Courses: Step
9 - Second & Additional Courses:
Sweep top of underlying course and stack next course
in a running bond pattern so that middle of the unit
is above the joint between adjacent blocks below (8"
[200mm] offset). Continue stacking courses to a
maximum of 2 courses (24" [600mm]) before
backfilling.
Step 10 - Backfill Drainage Material:
A free-draining, 3/4" (19mm) clear stone drainage
material is placed immediately behind the wall
facing and compacted with a light manual tamper. The
drainage layer must be a minimum of 12" (300mm) deep
and protected from the native material by the filter
cloth.
Step 11 - Continue Stacking & Backfilling:
Continue stacking units and backfilling as described
in Steps 10 & 11 until the desired height is
reached, based on the design.
Step 12 - Place Top Course:
A layer of concrete adhesive must be applied to the
blocks in order to afix the top course in place.
Place the top course blocks firmly on top of the
adhesive, ensuring both surfaces are free of debris,
and apply pressure to secure. Follow adhesive
installation guidelines. Pisa2 Revers-a-Caps or
Coping Units can also be used to finish the wall.
 Step
13 - Encapsulate the Drainage Layer & Finish Grading: Step
13 - Encapsulate the Drainage Layer & Finish Grading:
Fold the excess filter fabric over the top of the
drainage layer and extend up the back face of the
top course. Ideally, place an impervious layer of
soil on top of the filter fabric and compact
manually, providing for the required grading and/or
swales. For other treatments such as pavers,
concrete, or asphalt, care must be taken to ensure
that heavy compaction/paving equipment remains a
minimum of 36" (1.0m) from the back of the top
course. Slope the surface above and below the wall
to ensure water will flow away from and not
accumulate near the wall units.
|